Home Sauna Build: Frame, Wiring And Insulation
Following the plans you’ve made, measure and mark rough dimensions for the wall base plate.
Frame:
The stud frame for each sauna wall can be constructed outside the sauna and then moved into place if the sauna is to be smaller than the space where it will be installed. You need to build the sauna walls allowing for air intake and exhaust vents, the opening for the sauna door and if you have planned for any windows then you’ll need to account for these too.
Once the stud frame is complete the sections can be raised and attached to the walls or floor with the correct anchor bolts or nails. Next add the frame for the ceiling.
Electrics:
Once the stud frame is in place the next consideration is the electrical requirements.
You will need to hire an electrician to install the electrical circuits for the sauna heater, controls and lighting. Many sauna heaters are available with the controls built-in on the bottom of the heater, if your budget allows we recommend that the sauna controls be located on the outside wall of the sauna for convenient access.
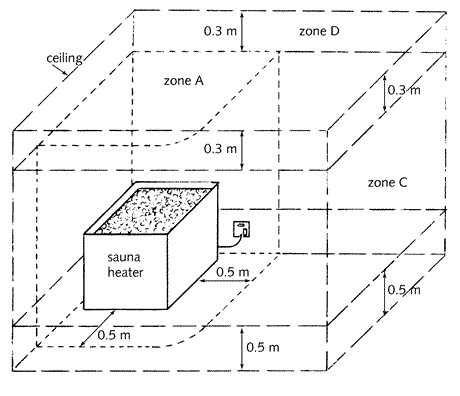
Special Regulations exist for wiring in saunas. The sauna is divided in to zones much like a bathroom, but this time they are concerned more with temperature levels than contact with water.
Zone A
The volume within 0.5 m horizontally from the Sauna heater and extending from the floor up to within 0.3 m from the ceiling.
Zone B
The volume covering the whole of the sauna room outside zone A up to 0.5 m above the floor
Zone C
The volume directly above zone B and extending upwards to within 0.3 m from the ceiling.
Zone D
The volume covering the whole floor area of the room and extending down from the ceiling for a distance of 0.3 m, including the space in this volume directly above the sauna heater.
The extents of the four zones are shown in diagram below
Wiring must be of the correct rating and located along the cooler side of the sauna wall inside conduits. The following cable specifications are recommended:
HTFS for temperature controls and any other controls in the Sauna
HTFL for lighting within the Sauna
HTF 3 core for the heaters
The best option here is to give your specification to the electrician and let them install the wiring on your behalf.
Insulation:
Once the sauna wiring has been installed, you will need to install a vapour barrier and the insulation to keep the heat inside the sauna. A layer of high temperature aluminium foil vapour barrier (reflective side facing inwards) must be used to prevent moisture from collecting in the sauna walls, this barrier is also used to reflect heat back into the sauna.
Once the vapour barrier has been installed you will then need to use a suitable insulating material. Saunas are commonly insulated with conventional fibreglass batts.
This type of insulation should be chosen according to its “R” value. This is the value that defines its ability to retain heat. A value of 13 is adequate for sauna walls while “values of 22 to 26 are commonly used in the sauna ceiling. If you wish to use R13 for the ceiling then ensure two layers are installed but laid in different directions.
